 Skip to content
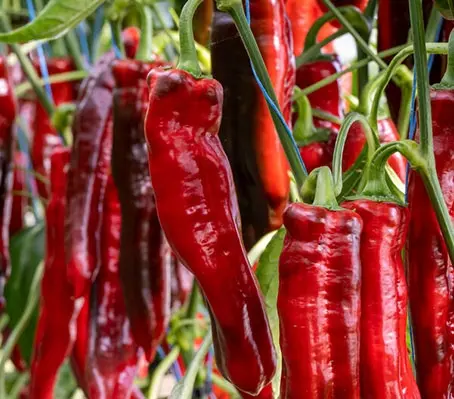


Pepper, Sweet Pepper ‘Dulce Italiano’ Organic
Sweet Pepper, Italian Frying Pepper
€3.50
Packet Size:20 Seeds
Packet Size:20 Seeds
‘Dulce Italiano’ is one of the most aromatic red pepper varieties from Italy, it bears very large, glossy red fruits that are really very sweet. This variety is often used for roasting and frying but also tastes wonderful when eaten fresh.
Very high-yielding this Lamuyo-type sweet pepper produces elongated, wavy, sweet peppers that ripen from green to bright red. At the early green stage, the fruits are also aromatically delicious, and they are not as tart as other varieties, but the best time to harvest is when fruits become red, as it is at the red stage that the fruits develop their extremely sweet and aromatic taste.
Suitable for outdoor and greenhouse cultivation, the vigorous plants grow to around 120cm (4ft) in height with a spread of 45 to 60cm (18 to 24in). From mid-season will have to be well staked to support the abundant production of beautiful pendulous pods.
‘Dulce Italiano’ can grow to over 20cm (8in) long up to 6cm (2½in) wide at the shoulder and weigh around 110gms, the fruits can be partially compressed and twisted and do not have a pronounced tip. They have thin skin, and the flesh has thick walls. Their size makes them well suited for skinning and for pickling.
They can be picked green or left on the plant to ripen from green to a rich scarlet red. 100 days from transplant to harvest.
- Organic Seed.
This seed has been organically produced. The seed has been harvested from plants that have themselves been grown to recognised organic standards, without the use of chemicals. No treatments have been used, either before or after harvest and the seed is supplied in its natural state. It has been certified and is labelled with the Organic symbol.
Sowing: Sow indoors from mid February to April
‘Marconi Rosso’ peppers need a long growing season. They can be sown February to April but are best sown before the end of March. They flourish in a sunny, sheltered position on a south facing wall, in fertile, well-drained soil or grown in a green-house, in pots or in the ground.
Fill small cells or trays with a good sterile seed compost and sow the seeds on the surface. “Just cover” with a fine sprinkling of sieved compost or vermiculite. Keep the compost moist – don’t let the top of the compost dry out (a common cause of germination failure) If you wish, spray the surface with a dilute copper-based fungicide.
Cover the pot or tray with plastic or place in a heated propagator, south facing window or a warm greenhouse. The ideal temperature is around 22°C (72°F). They can be slow to germinate from 21 to 28 days. Remove the cover as soon as seedlings appear.
Transplanting:
When the seedlings have produced their first pair of true leaves and are about 5cm (2in) tall they can be transplanted to individual 9cm (4in) pots. Use good quality potting compost and mix in some organic slow release fertiliser. Pot the seedlings on again into 2 litre pots before they become root-bound.
Water the seedlings regularly, but don’t let them become waterlogged as this encourages rot. Don’t let them dry out as they rarely recover at this stage. Water the soil, not the foliage. Once the plants have established, it is better to water heavy and infrequently, allow the top or the compost to dry out in between watering.
Seedlings should be grown in good light, but should not be exposed to direct sunlight from late spring to early autumn. Weaker sunlight from autumn to spring is unlikely to do them harm. Once seedlings have put on some growth they need lots of light. Growing them under a grow-light produces excellent stocky plants, as will a warm sunny windowsill. Adult plants need lots of light. However, more than 4 hours or so in hot direct sunlight will dry them out quickly.
In May to June transplant to greenhouse border, growbags or large pots. Wait until June for plants that are to be grown outdoors in the ground or in 4 to 5 litre pots
Acclimatise to outdoor conditions for 2 to 3 weeks before they are moved permanently outside. Plant them into rich moist soil. Flowers do not form and fruit will not set if the temperature is much below 17°C (62°F) for most of the day, so wait until June for best results with outdoor planting.
Cultivation:
The plants can be left to grow as cordons with supports and just pinch out the top when they reach the greenhouse roof. But the best method is to pinch out the growing tip and produce a smaller bushier plant that will only need a little staking and produce earlier fruits which should ripen easier.
After the first flowers appear, feed every one or two weeks with a half-strength liquid tomato feed. You could also add some Seaweed extract to the water once a week.
Pollinating Flowers: (optional)
The plants are self fertile and will generally pollinate themselves. However, if you want to give them a helping hand to ensure that lots of fruit are set indoors, use a cotton wool bud or paintbrush to gently sweep the inside of the flowers, going from one flower to the next, transferring the pollen. The flower’s petals will drop off as the green middle part of the flower starts to swell slightly. This is the pepper beginning to grow.
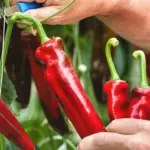
Harvesting: July to October – 92 days from transplant to harvest.
The peppers will take a few weeks to develop and a further couple weeks to ripen. You may pick them off the plant any time after they are fully developed but do not leave them on for too long, as delaying after the pepper is ready for harvest will result in a decline of further yields.
Storage:
After harvesting eat fresh or dry the peppers by putting them into a mesh bag, hang the bag up in a dry, airy, but not sunny spot. When they are completely dry, you can make paprika by grinding the peppers. Don’t grind the stalks. You can regulate the spiciness of the result by including more or less of the seeds and veins.
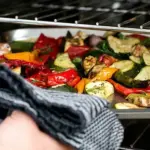
The fruit can be used green or ripe, and it can be seeded and frozen for use over the winter, a technique that also preserves its rich flavour much better than drying.
Companion Planting:
Good Companions: Tomatoes, geraniums, and, petunias.
Bad Companions: Avoid beans, kale, cabbage, and brussels sprouts.
Seed Saving:
Allow pepper to mature on plant until it is fully ripe and begins to wrinkle. Open and remove seeds, allow to dry in a dark place for a week or two, turning every few days for even drying.
The key to maintaining pepper seed viability is in how it is stored; you must keep a constant temperature and eliminate any excess moisture. Correctly stored peppers seeds can last for many years, although the germination rate begins to wane as time goes by.
Store seeds in a cool, dark, dry area in temps between 1 and 10°C (35 to 50°F). Store them in airtight plastic containers or in tightly sealed glass containers, just keep the seed dry and cool.
Lastly, be sure to clearly label your seeds. Most pepper seeds look remarkably similar and it is easy to forget by the time planting time arrives. Label not only the name and variety, but also the date you collected them.
Italian Frying Peppers:
Italian Frying peppers are a variety of Capsicum annuum. Unlike some peppers that are unpleasantly bitter and acrid when unripe, the Italian Frying peppers are sweet and delicious in all stages of ripeness, whether green, yellow or red.
They are typically mild with a low level of heat, the Scoville units being only between 500 and 1,000. They can be eaten raw or cooked and are often used in salsa, stews, and rice dishes.
- Cubanelle peppers boast a fantastic pepper flavour without being ‘hot’ and are typically used in dishes where a little bit of spice is desired but not overwhelming heat.
- Poblano peppers are a good substitute for Cubanelle peppers because they have a similar flavour profile but with a bit more of a kick.
- If you’re looking for a completely mild pepper to use as a substitute for Cubanelle, then look no further than the Marconi or the Corno di Toro pepper. These traditional Italian varieties are sweet and crunchy, making them a great addition to any dish.
- Cherry peppers are another good option for those looking for a moderate amount of heat in their Cubanelle pepper replacement. Cherry peppers are slightly sweeter than most other types of chili peppers, but they still pack a decent amount of heat.
- Banana peppers are another type of chili pepper that falls somewhere in the middle in terms of heat. They have a sweetness to them that is similar to bell peppers, but they also have a bit of spice that makes them a good stand-in for Cubanelle peppers.
- The final mild pepper on our list is the Anaheim pepper. Anaheims are typically used in Mexican cuisine, so if you’re looking for an authentic Mexican flavour then this is the pepper for you. They have a similar sweetness to cherry and banana peppers but with a bit more heat.
| Common Name | Sweet Pepper, Italian Frying Pepper |
| Other Common Names | Peperone , Cubanelle/Poblano type |
| Botanical Name | Capsicum annum 'Dulce Italiano' |
| Family | Solanaceae |
| Genus | Capsicum |
| Cultivar | Dulce Italiano |
| Species | annum |
| Height | Grows to around 120cm (48in) tall |
| Fruit | Ripens from green to red. Thick flesh - 5 to 6in long - 2in wide |
| Hardiness | Tender Perennial |
| Harvest | Pick them off the plant any time after they are fully developed |
| Soil | Rich moist soil. |
| Position | Grown in good light, but should not be exposed to direct sunlight |
| Season | Mid Season - 100 days |
| Time to Harvest | 100 days from transplant to harvest. |
| Time to Sow | Sow from mid February to mid June |
| Uses | Large Stuffing, Roasting Pepper |
| Notes | Pod Type - Cubanelle / Italian Frying Pepper |
| Other Language Names | Fr: Poivron Corne de Taureau. IT: Peperone marconi |